
What happens behind the scenes of a TPLO surgery?
So your dog has been diagnosed with a cranial cruciate ligament (CCL) injury and is scheduled for a Tibial Plateau Leveling Osteotomy (TPLO) surgery at Simon Veterinary Surgical.
As you are waiting for the big surgery day, we know you might be a bit curious about what happens while your pup is under our care. So today, we’d like to walk you through a typical TPLO using our lovely patient, Coco, to help illustrate the process.
If you’d like a quick recap on what a TPLO is and why it is needed, you can learn more about it here.
Okay, let’s dive in!
WARNING: This blog contains graphic content
Final physical evaluation
Before any surgery, Dr. Simon performs one final evaluation, to make sure the procedure is the best option for her patient.
Here, you can see that Coco is favoring her back left leg, indicating pain in that region.
When Dr. Simon manually palpates the stifle (knee) joint, you can further see that there is excessive sliding between the tibia and femur bone, a clear sign of a CCL injury.
Anesthesia
After Dr. Simon performs her evaluation and determines that Coco is fit for surgery, our happy pup is anesthetized, using a combination of sedatives and anesthetic agents based on her weight and individual needs.
Coco will be unconscious for the rest of the process, to minimize stress during the different stages.


Prepping the surgery site
Next, the SVS team shaves Coco’s leg. Dirt and bacteria can get trapped in the fur, so it’s important to shave the entire area around the surgical site to decrease the risk of infection and post-surgical complications.
Pre-surgery x-ray
Our vet techs then take an x-ray of the leg, with the stifle flexed to 90°. This x-ray is very important because Dr. Simon will use it to take her pre-operative measurements.


Pre-operative measurements
While the vet techs are completing the last steps in the surgery prep process, Dr. Simon takes detailed measurements of the x-ray. She compares the slope of the tibial plateau against the long axis of the tibia to measure the original tibial plateau angle (TPA). Dr. Simon determines that Coco’s TPA is 28.5°, but she has seen them typically range anywhere from about 18° -45° (the steeper the slope, the more sliding and painful the dog’s stride will be).
During the procedure, Dr. Simon aims to adjust the angle of the tibial slope to 5° (+/- 5°), so measuring the original TPA will inform exactly how far she will need to adjust the angle during surgery.
While taking her measurements, Dr. Simon will also determine the size of the saw blade she will use to cut the bone and the size of the implant she will use to stabilize the bone back in place.
Sterilization
Next, Coco is taken to the surgery table and placed on her back. Her leg is thoroughly disinfected, her paw is covered in sterile wrap, and the surrounding areas are covered with sterile cloth.
The surgical instruments, including the drill, bone plate, and screws, are also disinfected in an 270°F autoclave for 30 minutes to ensure everything is completely sterile.


Checking the vitals
Coco is connected to a multi-parameter monitor, so our vet techs can continually watch Coco’s vitals, such as her heart rate, respiration rate, temperature, and oxygen. They will also record the status of each vital every 5 minutes, and adjust her anesthesia as necessary.
Inspecting the CCL and meniscus
Now that Coco has been fully prepped for surgery and Dr. Simon has made her per-operative measurements, we are ready to begin.
Dr. Simon makes an incision on the inside of the leg, cutting all the way into the joint.

She inspects the CCL to assess the amount of damage. In this case, you can see that Coco’s CCL was completely torn, further confirming Dr. Simon’s diagnosis.
Dr. Simon also inspects the meniscus, or cartilage cushion between the bones, to see if there is any damage. If there is, the damaged parts will be removed because cartilage is unlikely to heal on its own, due to its naturally low blood supply, and will continue to be painful. The joint capsule is sutured (stitched) closed and another incision is made right below the joint to expose the tibia, as Dr. Simon moves onto the osteotomy.
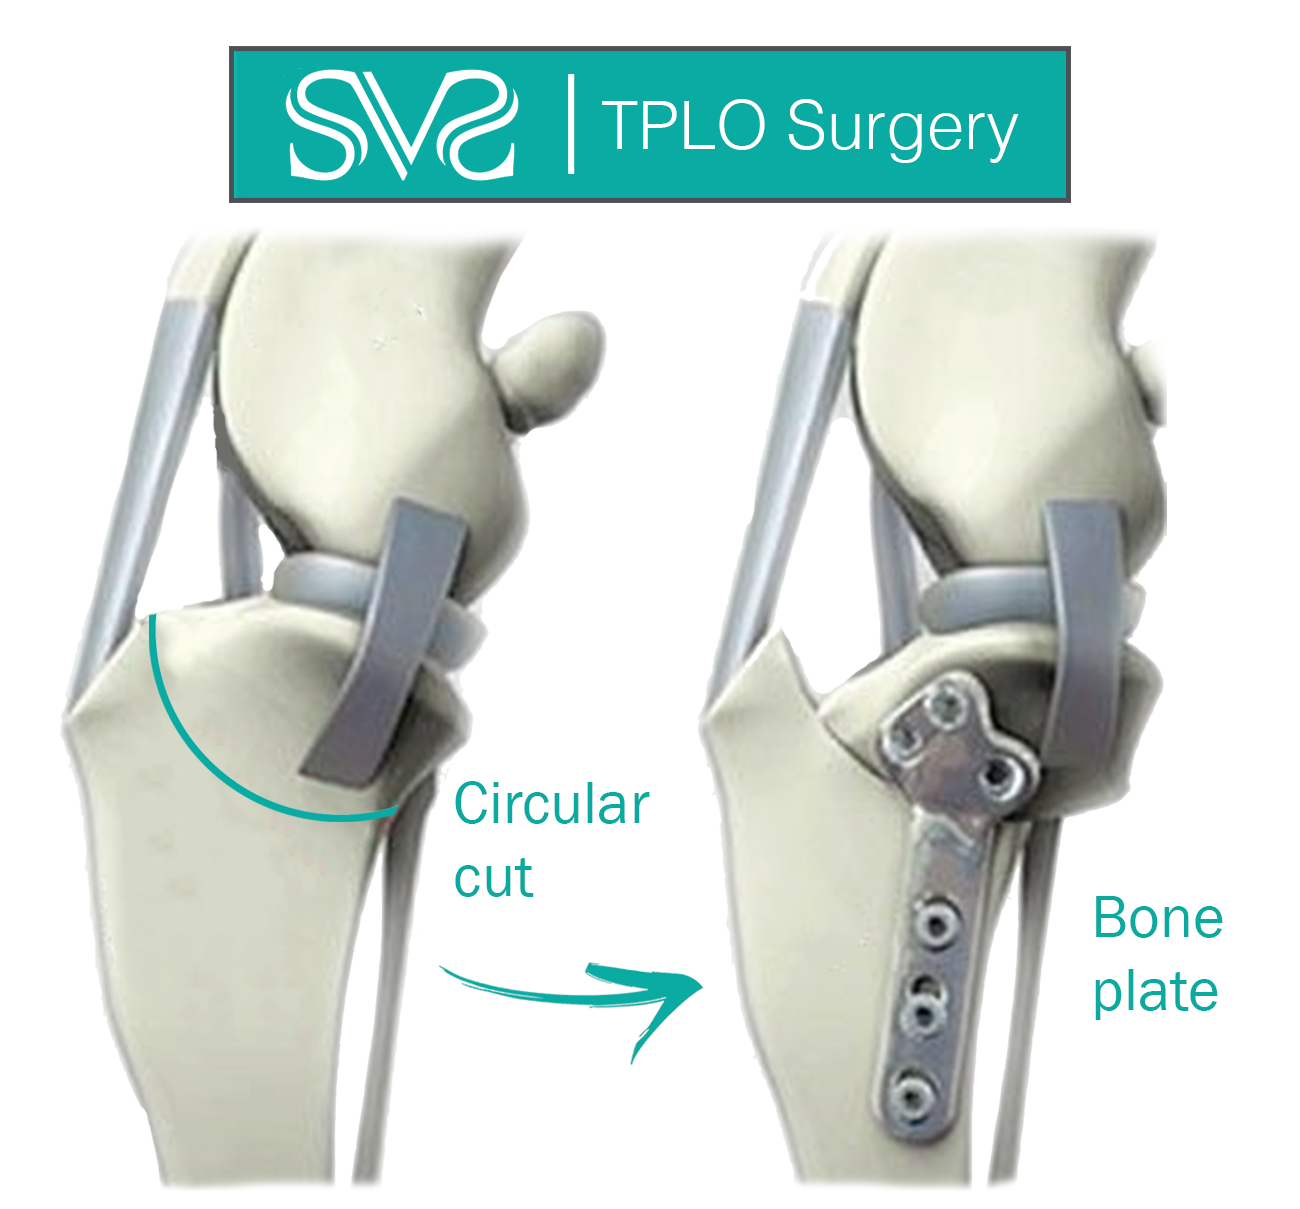
Completing the osteotomy
Dr. Simon begins the osteotomy by making a slight semicircular cut in the top of the tibia. Before cutting the bone the rest of the way through, she adds two small marks to identify the target adjustment angle, based on her pre-operative measurements.
She then rotates the piece of cut bone to align the two marks. A temporary pin is used to hold the bones in place as a permanent plate is fixed into place with locking screws. This plate helps the bone heal in the new angle configuration.


Closing the incision
That’s it! The hard part of the surgery is done and it’s time to close the incision. While doing this, Dr. Simon injects a long-acting local anesthetic throughout each tissue layer to help with the pain over the next 3 days.
Each layer of the incision is also closed individually, using absorbable suture on the inner layers.


Cold laser therapy
Once the incision is closed, the sterile part of the procedure is complete. Our techs apply cold laser therapy to Coco’s surgery site to stimulate the healing process.
Post-surgery x-rays
A final x-ray is taken to ensure the proper angle adjustment was achieved. Coco’s surgery was a success, with a final TPA of 5.25°. Remember, Dr. Simon is aiming for a TPA between 0° - 10°, with 5° being the gold standard.


Recovery
Our techs apply a bandage and move Coco to a recovery area where she is monitored as she slowly wakes up from the anesthesia. About 1 hour after surgery, she is fully awake and ready to go home.
The SVS team always sends our patients home with pain meds and clinically formulated supplements to assist in the bone healing process.
In addition to at-home rehab, Coco will come back in for a 2- and 6-week recheck so Dr. Simon can make sure everything is healing properly. We expect her to make a full recovery (minus the degree of arthritis that was already present) after 6 months and continue to have uninhibited, unrestricted activity for the rest of her life!
If you have any questions about the Simon Veterinary Surgical TPLO process, contact us today!